Testing with QuickTest QuickTest facilitates creating tests on your application by recording operations as you perform them. As you navigate through your site or application, QuickTest records each step you perform and generates a test that graphically displays these steps in an icon-based test tree.
Working with Keyword View – QTP Training Tutorial 2
This is a tutorial #2 in our QTP Training article series. Check out the first QTP tutorial in this training series here: Introduction to QuickTest Professional (QTP)
Introduction to QTP Keyword View
This article is going to give you an insight into the Keyword view of the QTP GUI. During this process we are going to get a quick introduction to Actions, Object Hierarchy and the basic columns in the keyword view.
Let’s start.
There is a drop-down box at the top and it shows “Action 1”.
What does this mean?
Introduction to Actions: Tests in QTP are recorded in terms of actions. Action is nothing but a set of statements performing a sequence of actions. Most often an action is simply a logical unit of modularity. The calls to one or more actions can be defined as a QTP test.
For E.g.: Let’s assume that in an online web based email system, the user needs to login, compose and send email and then logout, it is recommended that each of these operations be divided into 3 different actions although all of them can be written under one action.
‘Test Email’ will have:
| Action1 | >Login |
| Action2 | >Compose and send email |
| Action 3 | >Logout |
The Test is essentially:
Call to Action1; Call to Action 2; Call to Action 3
If written in one action, the lines of script would be large and difficult to manipulate and maintain. So the logical division is recommended. Also, as we move on further in our exploration about Actions we are going to understand how actions can be parameterized thus enabling easy repetition of a certain action as many times as desired.
So when you create a new QTP test it contains a call to one action, “Action 1”.
When we expand the drop down, it shows the Test Flow. For a test with multiple actions it shows the sequence in which each action is called thus making the name, “Test Flow” self explanatory. This drop-down not only displays the sequence of actions, it also provides the option for the user to select or go-to a particular action to view and/or Edit.
There is also a “Reusable Actions” Folder view. For now, let’s just say that reusable actions can be used by multiple tests and multiple times in the same test where it was created. We are going to discuss in detail how that can be achieved. Every action by default is reusable. This can be changed if need be.
Let’s take a little diversion here and talk a little bit about Object recognition hierarchy in QTP.
Object Hierarchy – If you have noticed in our example the Agent Name and Password are displayed under the item Login. A point to note here is that, QTP uses a tree hierarchy to store objects. In our case, the Agent Name and Password are the child objects to the container object Login which is the Dialog. Container objects are window, dialog box in a windows based environment and web page in a web based environment.
Here is an example, the login Dialog of the flights application:
The container here is the Login dialog and next level objects are Agent name, Password and the other buttons and images in the dialog. There are only 2 levels here. But there could be more levels, like browser.page.button in this case, browser is a container for page and page is a container for button.
Working with Keyword view:
I am going to use the test we recorded in the previous article. Opening the flights application. Entering the Agent Name and Password in the Login Page and Clicking on OK.
I am also going to add some function calls and statements to programmatically from Expert view and show you how they appear under the tabular form in the Keyword view.
This is the code I put in the expert view:
1 |
Dialog("Login").WinEdit("Agent Name:").Set "swati" |
2 |
Dialog("Login").WinEdit("Password:").SetSecure"5112fd3c42beb7a58069b67cfdd9b7e7ad1fc69c" |
3 |
Dialog("Login").WinButton("OK").Click |
4 |
msgbox "text" |
5 |
If x=0 Then |
6 |
msgbox "text 2" |
7 |
End If |
8 |
Window("Flight Reservation").ActiveX("MaskEdBox").Type"010312" |
9 |
Window("Flight Reservation").WinComboBox("Fly From:").Select "Denver" |
10 |
Window("Flight Reservation").WinComboBox("Fly To:").Select"Frankfurt" |
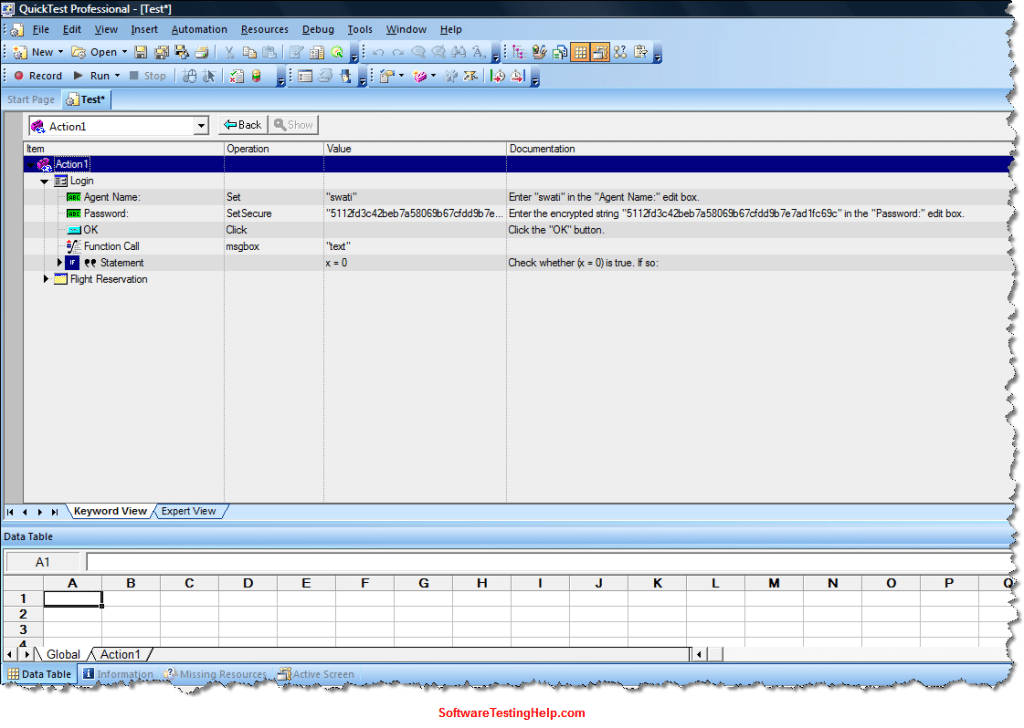
Lines 1 through 3 are the login operation. Line 4 is a function call to message box display operation. The I added a dummy if statement just to show you how it appears in the keyword view. X is a dummy value as well. Since we are not going to run this test, let’s just use it theoretically. Lines 8 through 10 are entering the date of flight and to, from locations. This is used to understand how objects are grouped.
————
This code appears as follows in the Keyword view: [click on image to enlarge]
As you can see there are 4 columns- Item, Operation, Value and Documentation. The table can be expanded or collapsed by clicking on the little arrow next to the action name.
Item: Each step is a sequence of events performed on an item. The item can be one of the following:
- Test object (e.g.: Agent Name Edit box)
- Utility Object: These are some objects reserved by QTP to be used in tests. E.g.: DataTable object. More coming up on this later.
- Statement: Any VB Script programmatic statement or even comments
- Function call: like ‘msgbox’ call in our program
Operation: It shows the operation that is performed on the item. When this column is clicked for a particular item it lists all the available operations that can be performed on the object.
Value: This column can be considered as the argument of a statement displayed. In our example, the message box function call has a value “Text”. There can be multiple arguments to one statement in which case this column will be divided accordingly.
Documentation: A read only column that translates a statement into easily understandable comments.
There are two other columns Assignment and Comment that can be added to the Keyword view table. To do so, the option to select isTools->View Options and choose the required columns from the list displayed.
Assignment: This column is not very widely used and what this does is assigns a value to or gets a value from a variable. [click on image to enlarge]
Comments: The tester can write anything under this column. It will be treated as comments in the expert view.
Conclusion:
Well, that sums up an interesting insight into the basic capabilities of the QTP keyword view. Actions are logical units of separation in a test. A test is therefore a series of function calls. When a new test is creation it contains one call to an action. By default all the actions are reusable. QTP follows a multi-level hierarchy to recognize objects. An object that contains a next level of objects is called a container. There can be more than one level of containers in a test.
In the next article we will talk about way we can use this view to Insert Steps. Modify them, Insert checkpoints, Breakpoints and how we can manage actions.
**********
QTP Tutorial #3 – Adding Standard Steps From Keyword View
his is a tutorial #3 in our QTP Training series. Check out the first two QTP tutorial in this training series here: QuickTest Professional (QTP) tutorials
Adding Standard Steps From Keyword View
In last tutorial we saw how to work with keyword view.
Today’s article is going to be about adding steps to a QTP test from the keyword view. Before we go about adding the steps, let’s see what kind of steps we can add at all:
- Standard Step: A standard step is anything that acts on an object. For example, a set operation on an edit box with a particular value or selecting a value from a list box.
- Checkpoint Step: Checkpoint is a step in a QTP Test that compares an expected value of a specific property/state of an object with the actual value. This is a kind of validation that QTP provides to the users to make sure their AUT is working as intended. So, when this kind of a step is inserted, QTP performs a check during this step execution and if expected and actual values are same, the checkpoint passes or else it fails. An example of a checkpoint is, if in an application a checkbox is supposed to be ON after its selected or a particular name that a text on the screen should be, etc. QTP has 10 checkpoints that it provides the users with. Apart from these, the tester can verify and validate any conditions by programmatically writing them. All the check points will be dealt in detail in the coming articles.
- Output value: As the name implies an output value is nothing but a variable that stores the outcome of a particular step in a test. This value can be used subsequently as an input for another step. This value is only available for the time period of a test run after which it gets reset. This topic also will be detailed out shortly.
- Comments: Any step that is a non-programmatic and won’t be executed, but is put in the script to increase readability is a comment.
- Conditional and Loop statement.
- Other: These are the kind of statements that help in designing the programming logic. Some examples are sync statement, writing into test results etc.
Let’s start with adding a standard step. For our convenience I am going to explain the use of only item, operation, value and documentation columns in the keyword view. Though there are two more columns, they are seldom used.
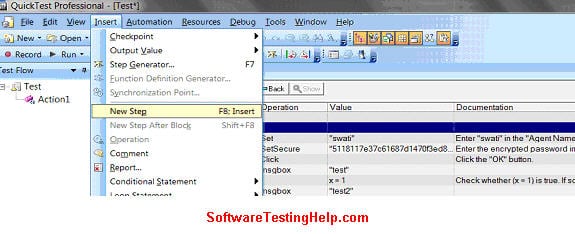
Inserting a step is the first part of adding a line to a program. A step merely adds a blank line in your test. It is up to the tester to define the step and to add details to the step. The details include what item to act on, what operation to perform, what value to assign etc. If it’s a new test, any step we are trying to add becomes the first step. From the menu main, select Insert-> New Step after clicking anywhere in the keyword view.
[Note – click on any image to enlarge]
Another way is to right click on an existing step and selecting Insert new step from the menu.
Both of these option result in the addition of a new line after the selected step. If a container object was selected while adding a new line, the new step gets added as a sub-step. If a last-level object was selected, the new line gets added as a sibling.
Here is how the new line looks like. The new line added is nothing but a skeleton that can be defined as required.
So, the first thing you see in a newly inserted line is a ‘Select an item’ drop down.
Given the fact that everything operation needs an object to be performed on, this is inevitable. Now as we already discussed item can be anything, a Test object, Statement, Utility Object or comment. The Test objects that are contained under a Container Object are displayed here. Therefore, according to our example, Agent Name, OK, Password is displayed in the list when a new step is to be added while clicking on or under the sub-level steps of the Login Dialog.
————
Object Repository:
If anything other than the items listed are required by the user there is an option to select the same from Object Repository. Now, this is the first time in our articles that we have encountered the word Object Repository. So, what is it really? When we try to put it simply, an Object Repository is what its name suggests. It a place or more like a database where all the Objects in a test are stored. This is what happens when the user chooses ‘Object Repository’ from the list.
So either from the list displayed or from Object repository an item can be selected. The next thing is to define the operation to be performed on the selected object. Click in the Operation column and a list of operations that can be performed on the selected object are displayed. This list is dependent on the type of object selected. For instance, a dialog object will have different methods available than when an Edit box is chosen.
Choose the desired operation
The next column is the Value. As we already know that this column is the argument to the operation to be performed on the selected item. On clicking in this column, the arguments are displayed as shown below:
If more than one argument is required to carry out the said operation, all the arguments will be displayed as multiple cells in the Value column.
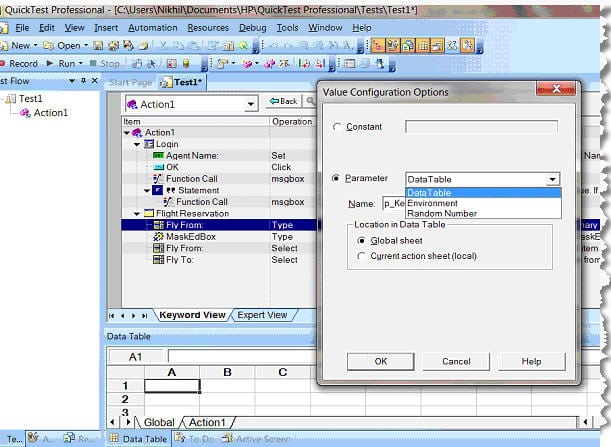
The type operation on the ‘FlyFrom’ item needs a keyboard input. When the icon in this column is displayed the following dialog is displayed that helps the user to configure this value.
As you can see from the window above, the value to be entered in this field can either be a ‘Constant’ in which case the constant value can simply be typed in the text box and then followed by clicking the ‘OK’ button in the window.
Or it could be parameterized, which means it would be picked up from a location in the data sheet, a random number or an Environment variable. How to parameterize a value for an argument will be discussed in length later on.
In our example, I am writing “Test” in the constant field and clicking OK and here is how the line generated looks:
It should be noted that the ‘Documentation’ field gets auto-populated with the description pertaining to the operation performed on the item selected.
Adding Conditional and Loop Statements in Keyword View – QTP Tutorial #4
Let’s continue HP QTP training series with our next QTP tutorial #4 – Adding Conditional and Loop Statements in Keyword View.
Understanding QTP keyword and expert view feature in detail is very important to learn QTP. So we have divided this Keyword View tutorials in four articles. This is the third article in Keyword View series.
Check out all the articles in this QTP training series @ Quick Test Professional (QTP) training series
[Note – Click on any image to enlarge]
Condition and Loop Statements in Keyword view
A quick recap of what we learned so far –
We acquainted ourselves with the Keyword View of the QTP and we are trying to understand the different features this view provides and see how these features can be used to write effective tests. To do that, we are working with a basic example where we recorded a series of simple operations on the Sample Flight Application.
This aids in understanding how QTP translates the steps performed on the application into a table with 4 essential columns of the Keyword view. Not only does QTP show the user the operations performed in terms of a table but also lets the user manipulate the steps from this very table.
We have explored how a standard step can be added to the keyword view. Apart from a standard step, this view also displays the conditional and loop statements in a test.
In this article we are going to explore how QTP’s Keyword view handles these statements.
Firstly, what do Loop and If statements do?
Loop Statement: This is a part of programming logic that is used when a particular set of statements have to be executed repeatedly for a particular number or times. Another variation to this statement is to repeat execution for a block of code until a certain condition is satisfied or while the said condition is satisfied.
If statement: As the name indicates, the if statement in a program is used to perform a check for a certain condition to be satisfied, and when it does a certain block of code gets executed. Variations to an ‘if’ statement is ‘if ..else’ and ‘if else if…’
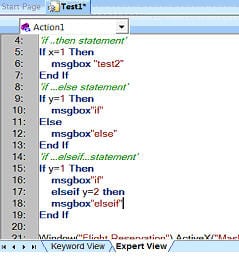
Keyword view has a different icon to indicate each of these statements in the keyword view. Let’s include some dummy steps into our program and see how these statements appear in the keyword view. For convenience and since the steps that I am about to insert are dummy, I am going to put the code directly into Expert view and we observe it in keyword view.
1) Conditional statements:
The above is the different variations of the ‘if’ statement that I entered in the expert view and as I said all the code does not serve any purpose except for our understanding. We will note how these statements are represented in the keyword view.
As you can see each statement type is given a different icon for identification.
2) Loop Statements:
Let’s look at how these statements are represented. We will follow the exact method that we did for conditional statement.
Adding condition statements to the keyword view:
For my examples above I have added the conditional statements from the Expert view and we merely looked at their representation in the Keyword view. So far we have not added them directly from the keyword view. Keyword view does provide a way for these statements to be added directly to the test. Here is how you can do it.
Click anywhere in the keyword view, just like how you would do it to add a standard statement, right click and choose “Insert->Step” followed by “Conditional Statement” and the statement that you would need. Here is how it looks:
As you can see above, An If..Then, Elseif..then, Else are the statements that can be chosen based on the requirement of the tester.
Let us choose an ‘if..then’ and see what happens.
This is what gets inserted. Now, just the way we would do for a standard step, we will need to define a conditional statement too.
Item: Click on the ‘item’ column corresponding to the ‘if’ statement and all the objects available will be displayed. This feature again is no different from the standard step definition. So choose an object that you wish to act on. As an example, I am going to check if the ‘Password’ field exists. So I choose “Password” from the list.
Operation: Again, a list of all the functions available will be displayed when this column is clicked on. Since I am checking if the password field exists or not, I will choose ‘Exist’
————
Value: The argument/arguments for the function is what this field is. For the ‘Exist’ function an argument is not necessary so we will leave it empty.
Let us now look at how this new statement looks in the keyword view as well as what it looks like in Expert view.
Keyword view
Expert view:
As you can see, the ‘if’ statement is defined.
Now, we have to add code or statements to define what needs to be done if the condition becomes true.
For the sake of our example, if the password box exists we will enter a value in the field. How can we accomplish this? Once a conditional or loop statement are added any steps that the user adds or records will be directly added under them unless explicitly specified. The statement added or recorded could be a standard step or another conditional or loop statements (nesting).
So, to define the ‘Then’ part of our ‘if’ statement, I am going to record the action of entering the password value. To do so, I will choose ‘Record’ from the menu options and enter a password value in the ‘Flights’ Login page. Take a look at the screen shots below, the recorded statement got directly added under the ‘if’ statement.
Any steps you add further will be added under to the ‘if..then’ block.
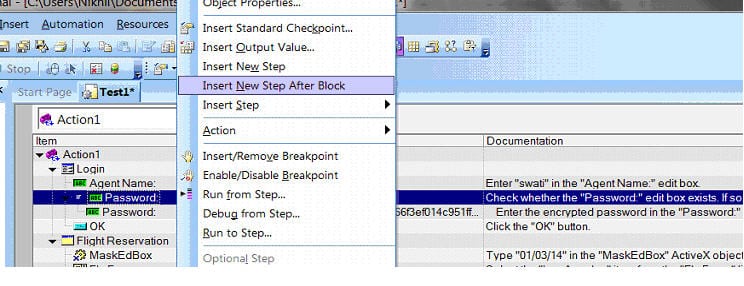
To want to add outside the block, select the block (the ‘if’ statement), right click and choose ‘Insert New Step after block’
The new step just comes as a sibling to the ‘if’ block.
Now, that we have understood the basic functionality it goes without saying that all the other conditional statements work the same way and any of them can be used as needed by the programmer’s logic.
Adding Loop statements to the keyword view:
The procedure to add the loop statement is by right clicking in the keyword where you want it inserted and choosing “Insert New Step->Loop Statement” and the required option.
As always, the inserted step has to be defined. Any steps recorded or added after the loop will be within the block and to exit the block the user has to be explicitly specify that the new step is to be added outside the block by right clicking on the loop statement and choosing “Insert New step after block” option.
Let us add a ‘For’ Statement as an example.
I chose the “For” from the menu option and this is what gets inserted into the keyword view:
In the value column I will set the iterator value. I set it as 1 to 3. Next I added a statement as “msgbox “x””. Let’s look at how this looks in the keyword view.
Conclusion:
So, that concludes our session on the conditional and loop statements and how they can be inserted from the keyword view. If or loop statements can be pretty much added just the way a standard step is added. Just like a standard step these steps also need to be defined. Steps that are recorded or added after a block statement will be added within the block by default unless specified. When a statement has to be added outside the loop we need to choose the option “Insert new step after block” option from the right click menu after choosing the block after which we desire the steps to follow.
QTP Tutorial #5 – Moving Steps and Dealing with Breakpoints
QTP training tutorial #5 – moving steps, deleting steps and dealing with breakpoints in keyword view. This is the fourth and the last article on QTP keyword view features.
If you missed any article in this QTP training series please check all articles on this page: QTP Training Tutorials
Other features of the Keyword View:
We are almost approaching the end of sessions concerning the ‘Keyword View’ of QTP. How it looks, what it does, what can we do with it – These are some of the aspects we are trying to unveil in the course of our articles. Understanding the view, adding steps, conditional statements are already dealt with.
Today we’ll learn remaining Keyword View features such as moving steps, deleting steps and dealing with breakpoints.
Just like always, we will use the sample test we have been working with – The login operation on the Flight sample application.
Moving steps:
1) The first and the simplest way – Keyword view acts like any text modification application when it comes to cutting, copying and pasting the steps. Thus, all the clipboard shortcuts are applicable.
- Ctrl+C – Copying
- Ctrl+V – Moving
- Ctrl+X- Cut
2) The next way is by choosing the menu option. To use this, select the step that needs to be moved and choose the following menu choices:
- Edit->Cut
- Edit->Copy
- Edit->Paste
3) The other method is dragging and dropping.
Any of the above methods can be used to move steps. However, there are few ground rules:
- The loop or condition statements can only be moved in blocks. For example, for an ‘if…else’ statement you cannot just move the else part.
- In a step, where the item is a child object and the user decides to move it, there is one of the two scenarios that come up. Either the step gets moved under the same parent or to a different parent. If it is moved under the same parent, it simply comes up in the new position chosen. But if it is moved under a different parent, the parent gets duplicated. Let’s see this pictorially:
[Note – click on any image to enlarge]
I am going to move the step where we enter the agent name (the one highlighted above) under the ‘Flight Reservation’ parent object. Let’s note that the parent object for ‘Agent Name’ is Login. I simply dragged the step to be the last one. This is how, it appears:
Earlier in the introduction sessions, we have discussed that we can have multiple actions in a test. Let us see how a test with multiple actions would appear in the keyword view and how this view can be used these actions as desired.
To achieve this is, I am simply going to convert all the steps under the parent object ‘Flight Reservation’ in our above example to appear under another action. Adding actions, steps to actions all these are going to be discussed in detail as we move on in our sessions.
Action 1:
Action2:
As you can notice in the test flow pane, the sequence in which these actions are executed is displayed.
————
If I would want the Action 2 to run first followed by Action 1, keyword view let’s me do that by allowing me to drag and drop the actions to the necessary position.
With this, we have covered all the information necessary to move steps/actions/blocks within a test using the keyword view.
Delete Steps:
Deleting steps from QTP could not have been simpler. All you need to do is choose the step that you do not want in the test and simply hit the “Delete” button on the keyboard or right click on a step and select “Delete” from the menu or select a step and choose “Edit->Delete” from the main menu.
If a step that has sub-steps defined for it is chosen for deletion, the following message is displayed to the user:
What this means is that, if a step with sub-steps is chosen for deletion, all the sub-steps get deleted too.
And, that’s all there is to discuss about deleting steps.
Adding Breakpoints to the test from the keyword view:
Often, during the execution there might be one or more things that you want to key an eye out for and observe what kind of changes are happening. This might be to see the state an Object gets to or to note a value a variable takes etc. A facility that helps us do just that is a Breakpoint. It is basically a certain point in your test where you want to pause the test run and observe or obtain certain information about your test. Most times this feature makes debugging easier.
Now, that we know what a breakpoint is, we will try to understand how to add them to our tests from the keyword view.
All you need to do is, click in the left margin at the particular step where you need to pause the test. The addition of a breakpoint is represented by a red dot in the left margin corresponding to the step where a break is added.
Here is how it looks:
Selecting a step and pressing F9 on the keyboard also results in the addition of a breakpoint.
Lastly, the menu option “Debug->Insert/Remove Breakpoint” can also be used.
So, once a breakpoint gets inserted, the test will run until the step where it is inserted normally and will come to a halt before executing it. At the point the tester can perform the required observations for which the program was stopped and continue to run it by choosing the “Run” option one more time from the main menu whenever he is ready.
If we add a breakpoint from the keyword view, the same is displayed in the Expert view also in front of the line corresponding to the row to which it gets added.
The vice versa is true too, if you add a breakpoint from the Expert view, it gets reflected in the keyword view.
As simple as it is to insert a breakpoint it is even simpler to delete is once its purpose is served or when it is no longer needed.
Delete Breakpoints
Clicking one more time on the line where the breakpoint already exists will result in its deletion. Keyword F9 or the menu option “Debug->Insert or Delete Breakpoint” can be chosen on a step with a breakpoint and it gets removed.
Conclusion:
So this concludes the discussion of all the properties and capabilities of keyword view in detail. This view is the most readable one among the two and once all the features are understood, we can use it as effectively as possible to make the tests robust.
This is the 6th QTP Tutorial in our QTP training series. Pleasevisit this post to check out list of all tutorials we covered till now. As a reminder, we have started the QTP online training article series and we’ll be covering almost all QTP tutorials with simple examples to understand the concept.
The last few QTP tutorials have been about the QTP’s Keyword viewwhich was really crucial in getting a high-level understanding of a QTP test’s structure and also introduced us to few ways in which our tests can be tailored to meet our needs. So I think we are ready to record our first test in its entirety. We are going to do just that in the next few QTP training articles. Today’s topic, therefore is the first step in doing so which is the “Record and Run settings’. We are going to understand all about this, why it is important and how this can affect a test.
Record and Run Settings Dialog
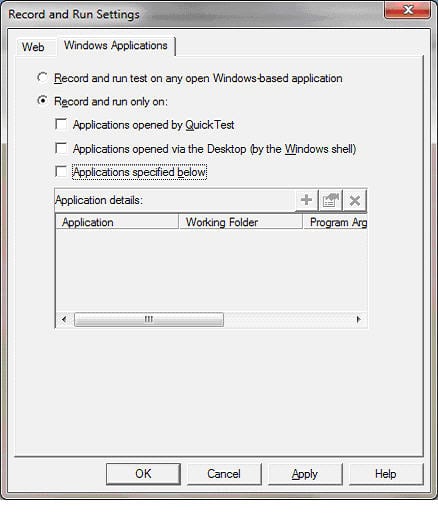
When QTP is launched and we choose to record a new test, the ‘record and run settings’ dialog opens up. Alternately a user can choose to access this window by choosing “Automation->Record and Run Settings” option from the menu. So far in our examples we have just continued with its default settings but now we will explore it further. The following is the how this dialog looks:
As the same suggests, this is a space that QTP provides the user to set certain parameters that help the user to create a test via record and to execute the same during a run session.
QTP can record and run a test on either a windows app or a web app.The web tab is available only when the Web add-in is selected to be loaded at start up. This tab is used for Web, .NET Web Forms, PeopleSoft, and Web-based SAP objects. So there are 2 tabs to define the settings separately for each of these environments. There will be a separate ‘Siebel’ tab available is a Siebel add-in is installed and loaded during start up.
Let’s look at the ‘Web’ tab first”:
“Web Tab” on Record and Run Settings Dialog:
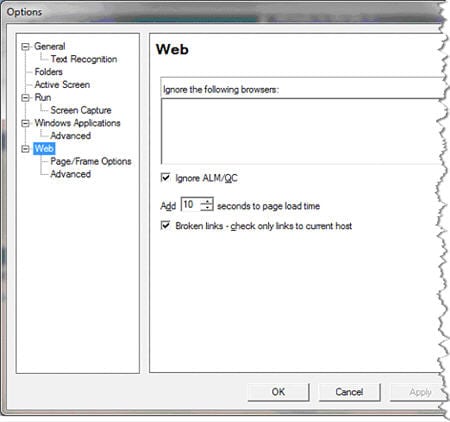
The default settings are as shown in the picture above. This setting means that when a record session is started the target of the record operation can be any of the web application that is already open in a browser. The user also has a instruct QTP to ignore certain web pages like QC or any other page with a specific URL or a specific title. The way he can do that is, “Tools->Options->Web” and define those pages in the following QTP dialog:
But if the user chooses, the next option “Open the following address when a record or run session begins” the corresponding elements in the screen get enabled. Take a look at it below:
The user can enter the address of any page and the choice of the browser. The browsers that QTP 11 supports are:
The browsers that are supported and are currently installed in your machine will only appear in the list.
————
There is another way to set the record and run settings other than from this window and that method is through Environment variables. Since we did not yet get there, we will discuss them in detail later on. For the sake of mentioning, if the environment variablesURL_env and Browser_env are set, then it overrides the URL and browser chosen in the ‘Record and Run Setting’ window. How to create these and how they work – all this will be dealt with later.
‘Do not record and run on browsers that are already open ‘– If this option is chosen all the browsers that are open prior to recording and running and also prior to launching QTP will be ignored. It is as if these browsers don’t exist for QTP because the user can not even spy these pages to view the objects. In other words, these browsers are totally ignored and as a result deemed inaccessible to QTP.
‘Close the browser when the test closes’ – this option when chosen will close the browsers on which the record and/or run session was carried out when the test ends.
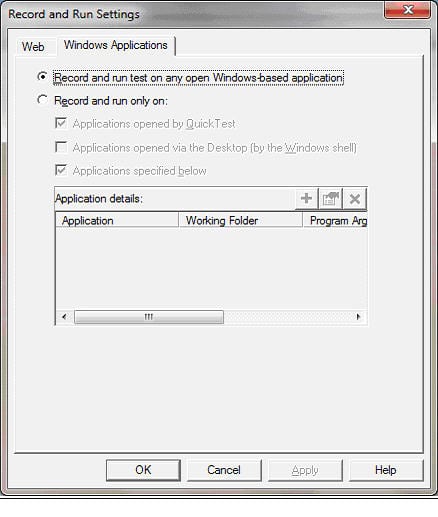
“Windows Tab” on Record and Run Settings Dialog:
This tab is for the windows based applications. The default option to record and run on any windows app opened.
If the “Record and Run only on’ option is chosen, the other options under it get activated.
- Applications opened by QuickTest: when this option is chosen, the applications that are opened as a result of an invoke operation performed by Quick Test are only chosen for recording
- Applications opened via the Desktop (by the Windows shell):This means that the application that are opened from a windows desktop are chosen
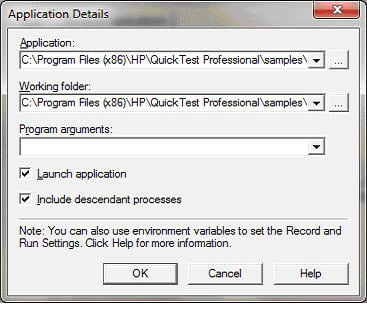
- Applications specified below: choosing this option will open another child window where a specific app to be opened by the QTP at the beginning of a record or run session can be defined.
As you can see from the above window, the path of an application and its folder should be added and QTP opens that particular app while record and/or run.
That concludes a quick introduction to various ‘record and run settings’ that can be used for a QTP test. When testing a web app, it is also important to make sure that we add the correct settings in the windows application tab too. It is crucial because, it will help us in preventing opening up of unnecessary applications and also to make sure that we do not accidentally change any of the already open windows applications. It should be noted that, the setting in the windows tab do not directly affect the testing performed on a web app.
So the recommended settings for the windows tab while testing a web app are:
Once these settings are done, the test recording begins. Any operation performed on the test gets recorded in the QTP. The tester can stop the record operation once all the steps that he wished to perform on the AUT are done by clicking on the “STOP” option available in the QTP menu.
The recorded steps can then be re-performed on the AUT by choosing ‘RUN’ option from QTP. Run operation too invokes the application (web or windows) depending on the setting specified.
Conclusion
This forms the basis for performing any basic steps on the AUT using QTP. In the real world this alone isn’t sufficient. Testing as an activity is verification and validation inclusive, so we will have to tailor these basic lines of code to include certain verification and validation points. To do so, QTP provides some checkpoints and the tester can also programmatically add steps to check few things as needed.
